Lab 8: Advanced Change Control - OSPF to eBGP
In this lab, you will explore Arista CloudVision’s Change Control workflows by migrating our underlay routing protocol from OSPF to eBGP. You will learn how to create custom CLI snapshots to capture pre- and post-migration states.
Using the Campus Fabric Studio, you will stage the protocol migration and then construct Action Bundles and Change Control Templates to execute the changes sequentially across the fabric.
Introduction to Change Control Components
Actions are used in a change control to run a series of commands on devices for the purposes of configuration, diagnostics, or monitoring.
An action bundle is a collection of actions that is then applied as a stage rule to a change control template.
A change control template is used as a structure for repeatable change control operations.
Lab Tasks – Creating Snapshots
First, we will create three custom snapshots to capture the state of our network before and after the routing protocol migration.
You can use snapshots to view a device's state at a single point in time, to compare device state across points of time, and to compare device state before and after a change control operation using EOS commands.
- Navigate to Provisioning > Snapshot Configuration in CloudVision.
- Click + New Snapshot at the top right of the page.
- Create a Common Snapshot for general routing information before and after our configuration changes:
- Name: Common Routing Verification
- Commands: show ip route show ip interface brief show running-config section router
- Leave the Devices dropdown box empty as it will automatically select devices when added to a change control.
- Keep the Capture Interval at the default 5 minutes.
-
Click Save.

-
Click + New Snapshot to create the OSPF Pre-Check:
- Name: Pre-Change OSPF State
- Commands: show ip ospf neighbor show ip ospf database
- Devices: Empty
- Capture Interval: 5 minutes
- Click Save.
- Click + New Snapshot to create the BGP Post-Check:
- Name: Post-Change BGP State
- Commands: show ip bgp summary show ip bgp
- Devices: Empty
- Capture Interval: 5 Minutes
- Click Save.
Lab Tasks – Campus Fabric Studio Configuration
We will now use the Campus Fabric Studio to change the underlay routing protocol for the Hartford Campus spines and leafs from OSPF to eBGP.
- Navigate to Provisioning > Studios.
- Open the Campus Fabric (L2/L3/EVPN) Studio.
- Navigate into the Hartford Campus Fabric by clicking on the carat next to Campus: Hartford.
- Navigate into the East-Campus Campus-Pod by clicking on the carat beside Campus-Pod: East-Campus.
- Locate the Underlay Routing Protocol setting for our campus devices.
- Change the protocol from OSPF to eBGP.
- Click the blue notepad button on the workspace island to Build and Review our Workspace.
Lab Tasks – Reviewing Configuration Differences
Before creating our change control, lets review the proposed changes to ensure accuracy.
- In the Workspace Review page, scroll down to Proposed Configuration Changes.
- Review the configuration changes of each device.
- Notice the removal of the OSPF configuration and the addition of the BGP configuration.
- Click Submit Workspace at the top right. This will create a change control where we will add our actions and push our configuration changes.
- Once you submit the Workspace, click the Close button in the pop-up as we will come back to our change control later in the lab.
Lab Tasks – Creating Action Bundles
An action bundle is a series of actions to be taken. It is used to build a change control template. We will create action bundles that utilize our snapshots and execute sequentially.
- Navigate to Provisioning > Change Control > Action Bundles.
- Click the blue + New Action Bundle button at the top right of the page.
- Name it Pre-migration snapshots and optionally enter a description for the action bundle.
- Beside the Add action button, click the Series option to have the actions execute one by one instead of in parallel (all at the same time).
- In the Add action dropdown box, add the following actions in order and select Provide via template in the DeviceID for all snapshot actions:
- The Common Routing Verification Snapshot
- Device ID: Provide via template
- Leave Template ID as Common Routing Verification
- Click In the Add action dropdown box, which now displays Common Routing Verification, and add:
- The Pre-Change OSPF State Snapshot
- Device ID: Provide via template
- Leave Template ID as Pre-Change OSPF State
-
Click Save
-
Click the blue + New Action Bundle button.
- Name it Migration from OSPF to BGP.
- Beside the Add action button, click the Series option.
- Click In the Add action dropdown box, and add:
- Set Configuration: This pushes the pending configuration to the device.
- Device ID: assigned by template
- Source: assigned by template
- Timestamp: assigned by template
- Click In the Add action dropdown box, which now displays Set Configuration, and add:
- Sleep: Set to 10 seconds. Provides time for BGP adjacencies to form and route tables to converge.
- Click Save
- Click the blue + New Action Bundle button.
- Name it Post-migration snapshots.
- Beside the Add action button, click the Series option.
- Click In the Add action dropdown box and add:
- The Common Routing Verification Snapshot
- Device ID: Provide via template
- Leave Template ID as Common Routing Verification
- Click In the Add action dropdown box, which now displays Common Routing Verification, and add:
- The Post-Change BGP State Snapshot
- Device ID: Provide via template
- Leave Template ID as Post-Change BGP State
- Review the list of actions, and click Save.
Lab Tasks – Creating a Change Control Template
A template consists of Action Bundles that you have bundled together into stage rules for execution. To create a template you'll need to configure both the template and the action bundles.
- Navigate to Provisioning > Change Control > Templates.
- Click + New Template.
- Name the template Underlay Migration.
- Click Save to create the template.
- Find the Parallel dropdown box beside Stage Rules and change to Series.
- Set the Stage Rule Name to Pre-Migration Snapshots by clicking on the pencil icon
 beside Stage Rule Name.
 - Select the Pre-migration snapshots bundle.
- Leave the Device Filter dropdown as All Devices in Change Control.
-
Sub-stages (Bundles) can be arranged in series or parallel. Keep the stage rules to execute in Series.
-
Click + Add Stage Rule
- Set the Stage Rule Name to Migration from OSPF to BGP
- Select the Migration from OSPF to BGP bundle.
- Leave the Device Filter dropdown as All Devices in Change Control.
- Leave the stage rules as Series.
- Click + Add Stage Rule
- Set the Stage Rule Name to Post-migration snapshots
- Select the Post-migration snapshots bundle.
- Leave the Device Filter dropdown as All Devices in Change Control.
- Leave the stage rules as Series.
- Confirm your Stages are listed in the proper order:
- Pre-migration snapshots
- Migration from OSPF to BGP
- Post-migration snapshots
- If they are not in order, use the Move Down and Move Up selections to arrange them.
- Once you're finished, scroll to the top and click Save Template.
Lab Tasks – Executing and Verifying the Change Control
Once a template has been created, you can then use it to complete an unlimited number of change controls.
- Navigate to Provisioning > Change Control.
- Click on Pending Approval in the header to filter the items listed.
- Click the pending change control we generated earlier from the Campus Fabric Studio.
- Click Select a Template and apply the Underlay Migration Template to this change control.
- There are 3 stages listed which are our Action Bundles..
- Find the Expand and Collapse icons
 hover over the icons and select Expand all Stages.
 - To expand and collapse each phase and action by device use the + or - icon next to the titles.
- You should see 7 devices in each phase executing two actions.
- Click Review and Approve, then Approve and Execute.

- Observe the progress in the left hand panel as the checkmarks indicate task completion.
- For additional details, click on leaf-1a Pre-Change OSPF State snapshot to view the details.
Lab Tasks – Reviewing and Comparing Configuration Changes
Once all stages have completed, we can review and compare configuration changes between two devices or over a period of time.
- Navigate to the Devices > Comparison section within CloudVision.
- Select Time Comparison to compare the state of a device at two chosen times.
- In the Select Device dropdown, select leaf-1a.
- Select 30 minutes ago in the Quick Link options.
- Click Compare to open the Compare Overview page.
- Notice the BGP Configured metric is highlighted.
- In the left-hand menu, navigate to the IPv4 Routing Table to compare leaf-1a’s current routing state against its status from 30 minutes ago.
-
Review and confirm all OSPF routes have been removed and replaced with BGP routes.
-
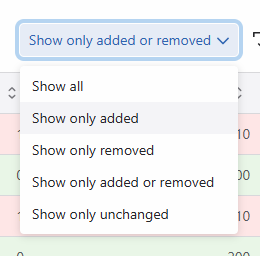
Above the table and to the right, click on the dropdown titled Show only added or removed and select Show only added. Observe the changes to the table.
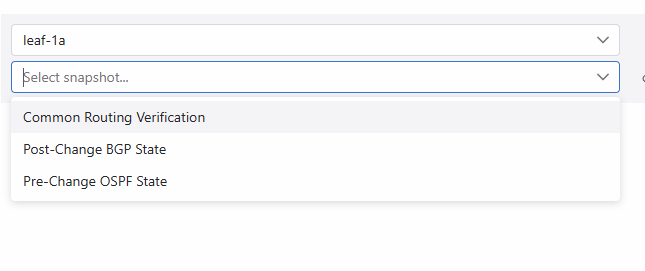
- In the left-hand menu, click Snapshots.
- In the Select snapshot… dropdown box select Common Routing Verification.
- Click into the dropdown box directly below Common Routing Verification and choose the date and time of the first snapshot.
- Scroll through and review the changes made to the snapshots shown. Note that any changes highlighted in green were added and any highlighted in red were removed.
- Notice that all OSPF routes have been converted to BGP.
Once you have verified that the BGP states are correct and the change control finished without errors, you have successfully completed the lab. Congratulations.