Lab 4 - Static Configuration Studio - Container Tree
In Arista CVaaS, the Static Configuration Studio is a tag-based, visual way to manage CLI-based configuration “snippets” utilizing the concept of containers and configlets.
We move from automated fabric generation to building a logical, tag-based hierarchy that governs how configurations are inherited across your entire network.
Lab Tasks – Building the Container Tree
Think of the Container Tree as a set of nested folders. At the top, we have broad classifications like State: CT and State: MA. As we move down, we get more specific, nesting our Campus and Role tags within those states. This structure allows a single configlet at the 'State' level to be inherited by every switch inside it.
We are mixing two types of 'DNA'. Custom tags, like 'State: CT', are manually created by us to reflect our business logic. System tags (or CloudVision tags), like 'Campus: Hartford', were automatically generated when we built our fabric earlier. By nesting these together, we create a powerful hybrid map that combines our custom organizational needs with the automated fabric hierarchy.
Pro tip: If you ever accidentally put a container in the wrong spot, use those three stacked lines  to drag and drop it vertically or horizontally until the hierarchy looks correct.
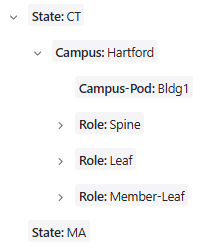
We are going to create the following structure - move on to the next step to begin:
- State: CT (Custom Tags)
- Campus: Hartford (System Tags)
- Campus-Pod: Bldg1
- Role: Spine
- Role: Leaf
- Role: Member-Leaf
- Campus-Pod: Bldg1
- Campus: Hartford (System Tags)
-
State: MA
-
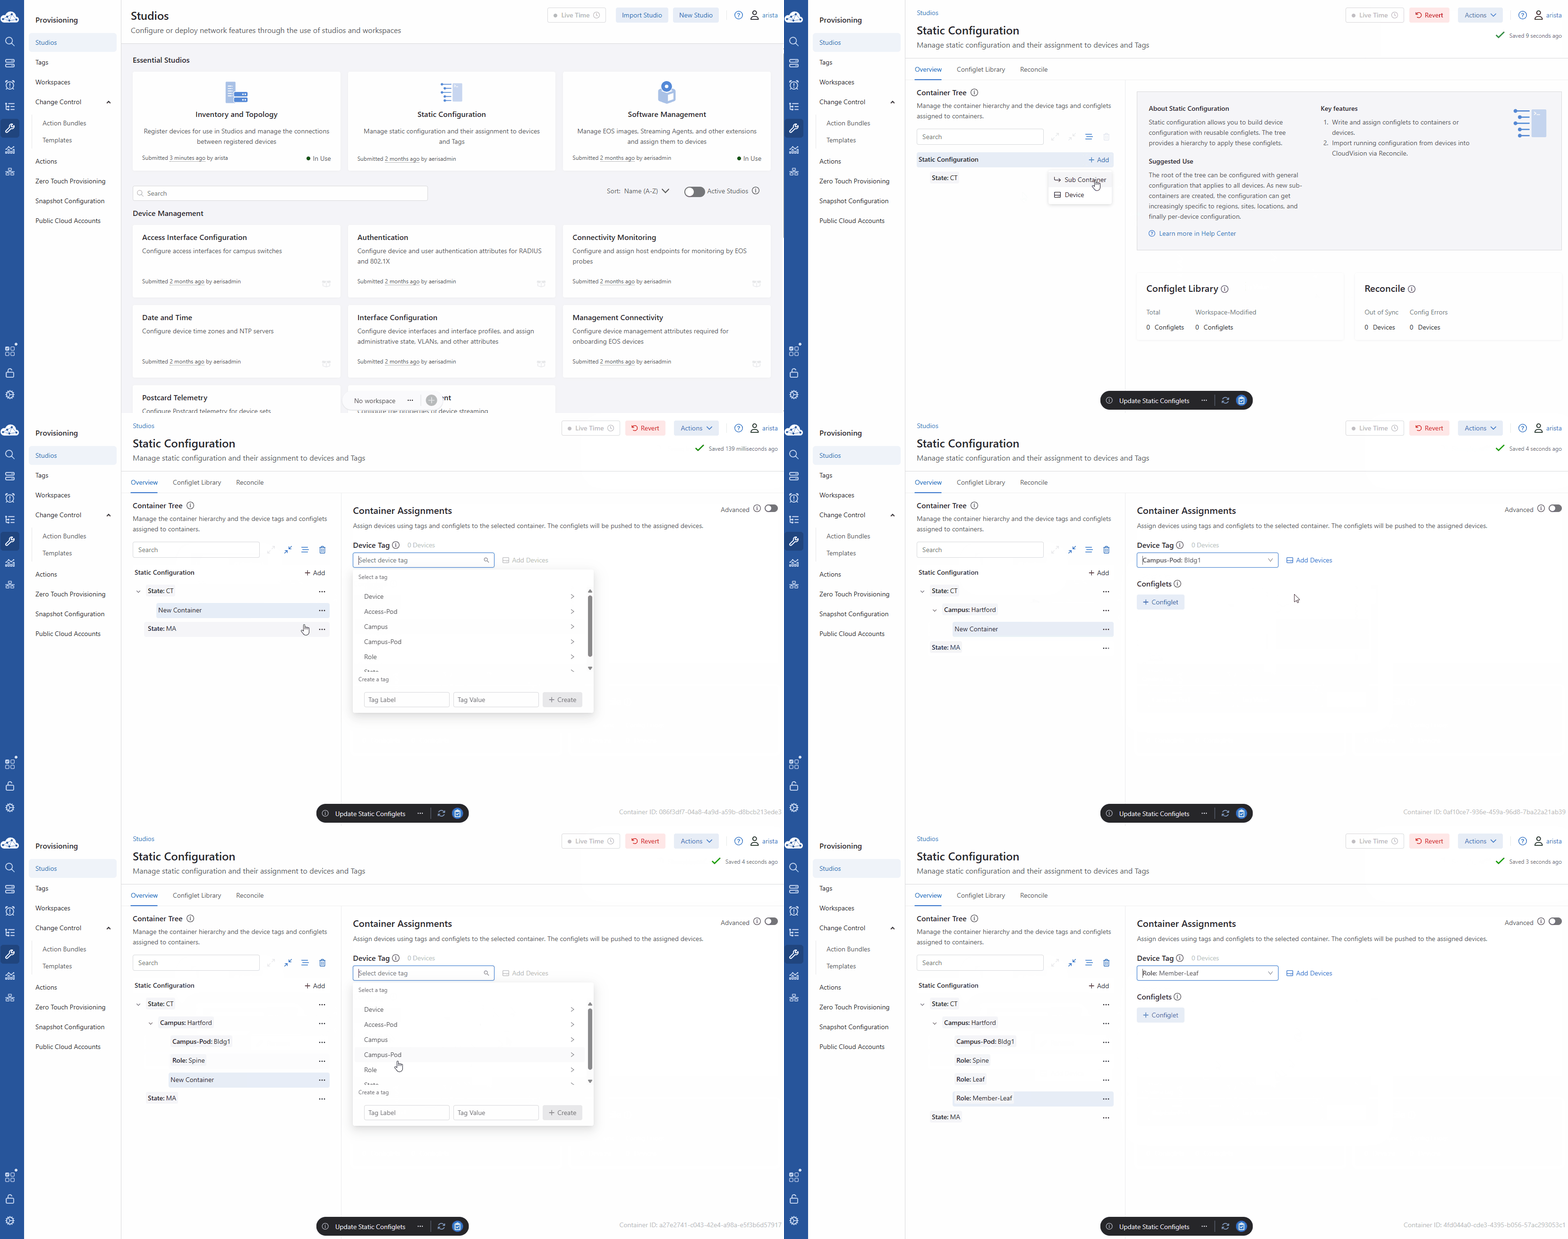
Navigate to Provisioning > Studios and select the Static Configuration studio.
- Click +Configuration Container.
- Create the first level:
- In the Container Assignments panel (right), select the drop-down field under Device Tag.
- At the bottom of the list, create this top-level tag ****
- Tag Label: State
- Tag Value: CT
- On the left at the top-level, click +Add > Sub Container.
- Create another top-level tag
- Label: State
- Value: MA
- Click the three dots (…) next to State: CT and select Add Sub Container.
- In the dropdown, select Campus > Hartford.
- Continue adding sub-containers under Campus: Hartford for the following tags:
- Campus-Pod: Bldg1
- Role: Spine
- Role: Leaf
- Role: Member-Leaf
Lab Tasks – Assigning Devices
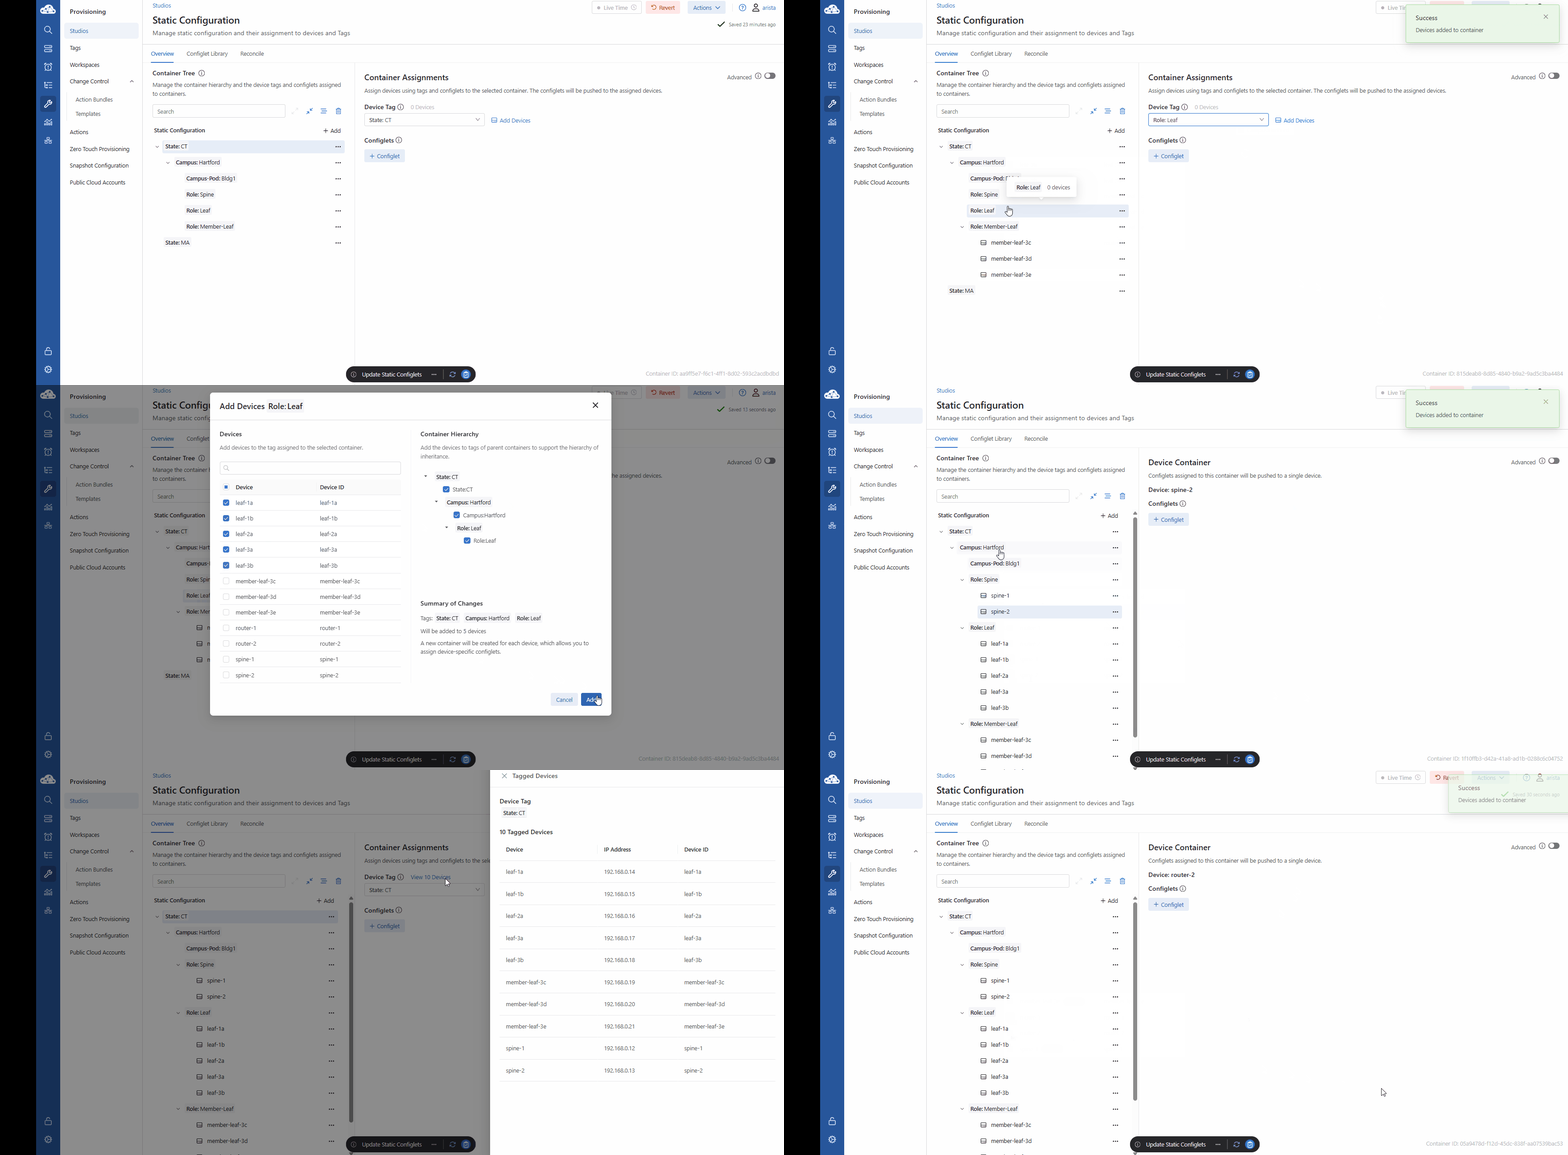
Now we need to put the switches into their proper containers. We’re selecting our Member-Leafs, Leafs, and Spines and assigning them to their respective Role containers.
This is where the magic happens. Click on the State: CT container and select View 10 Devices. This means that later, when we want to apply a security banner to every switch in Connecticut, we only have to do it once at the top of the tree.
- Select Role: Member-Leaf in the tree. Click Add Devices (right) and check Member-Leaf3c, 3d, and 3e.
- Select Role: Leaf and check all Leaf switches.
- Note: You can hold shift to select multiple devices
- Select Role: Spine and check both Spine switches.
- Click Campus: Hartford
- On the right panel next to Device Tag, click View 10 Devices to verify tag inheritance.
- Select State: CT and click View 10 Devices to verify tag inheritance.
The resulting tree should look like this:
Lab Tasks – Change Control
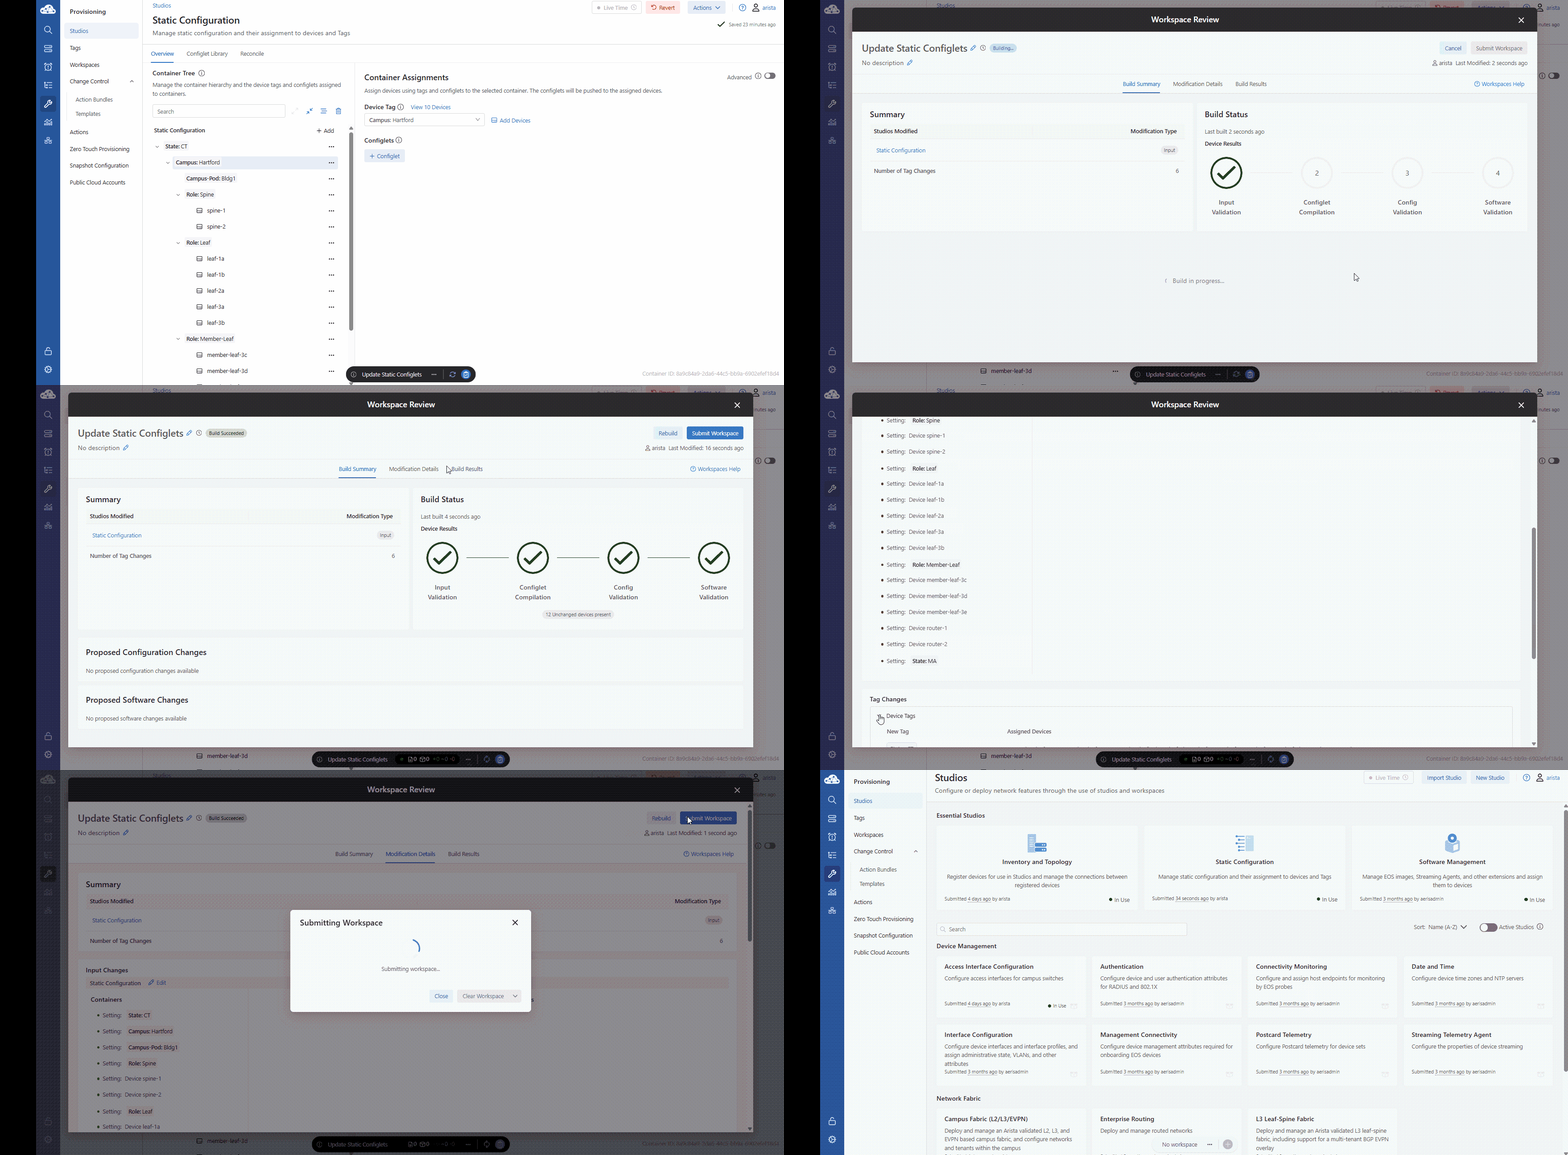
We’re finishing on Workspace Island. When you click Review and Submit, pay special attention to the Modification Details. Expand the Device Tags panel. It’s important to realize that we aren't changing the CLI on the switches yet; we are updating the metadata that CloudVision uses to target those switches. Once the build status is green, submit your work. You’ve officially built the foundation for scaled management.
- On the Workspace Island, click the Review and Submit button ( clipboard ).
- Verify all Build Status checks pass (Validation and Compilation).
- Click Modification Details (top center) and expand the Device Tags panel to review changes.
-
Click Submit Workspace, then Clear Workspace.
All tasks are finished! Time to move on.