OpenConfig gNMI
This lab will walk a user through connecting to both an Arista EOS device and an Arista CloudVision instance to test streaming telemetry of common metrics all through a standard OpenConfig streaming interface known as gNMI. These simply scratch the surface of what is available. More complex and better examples are maintained by Arista on the open management page. Examples will be using the gNMIC binary.
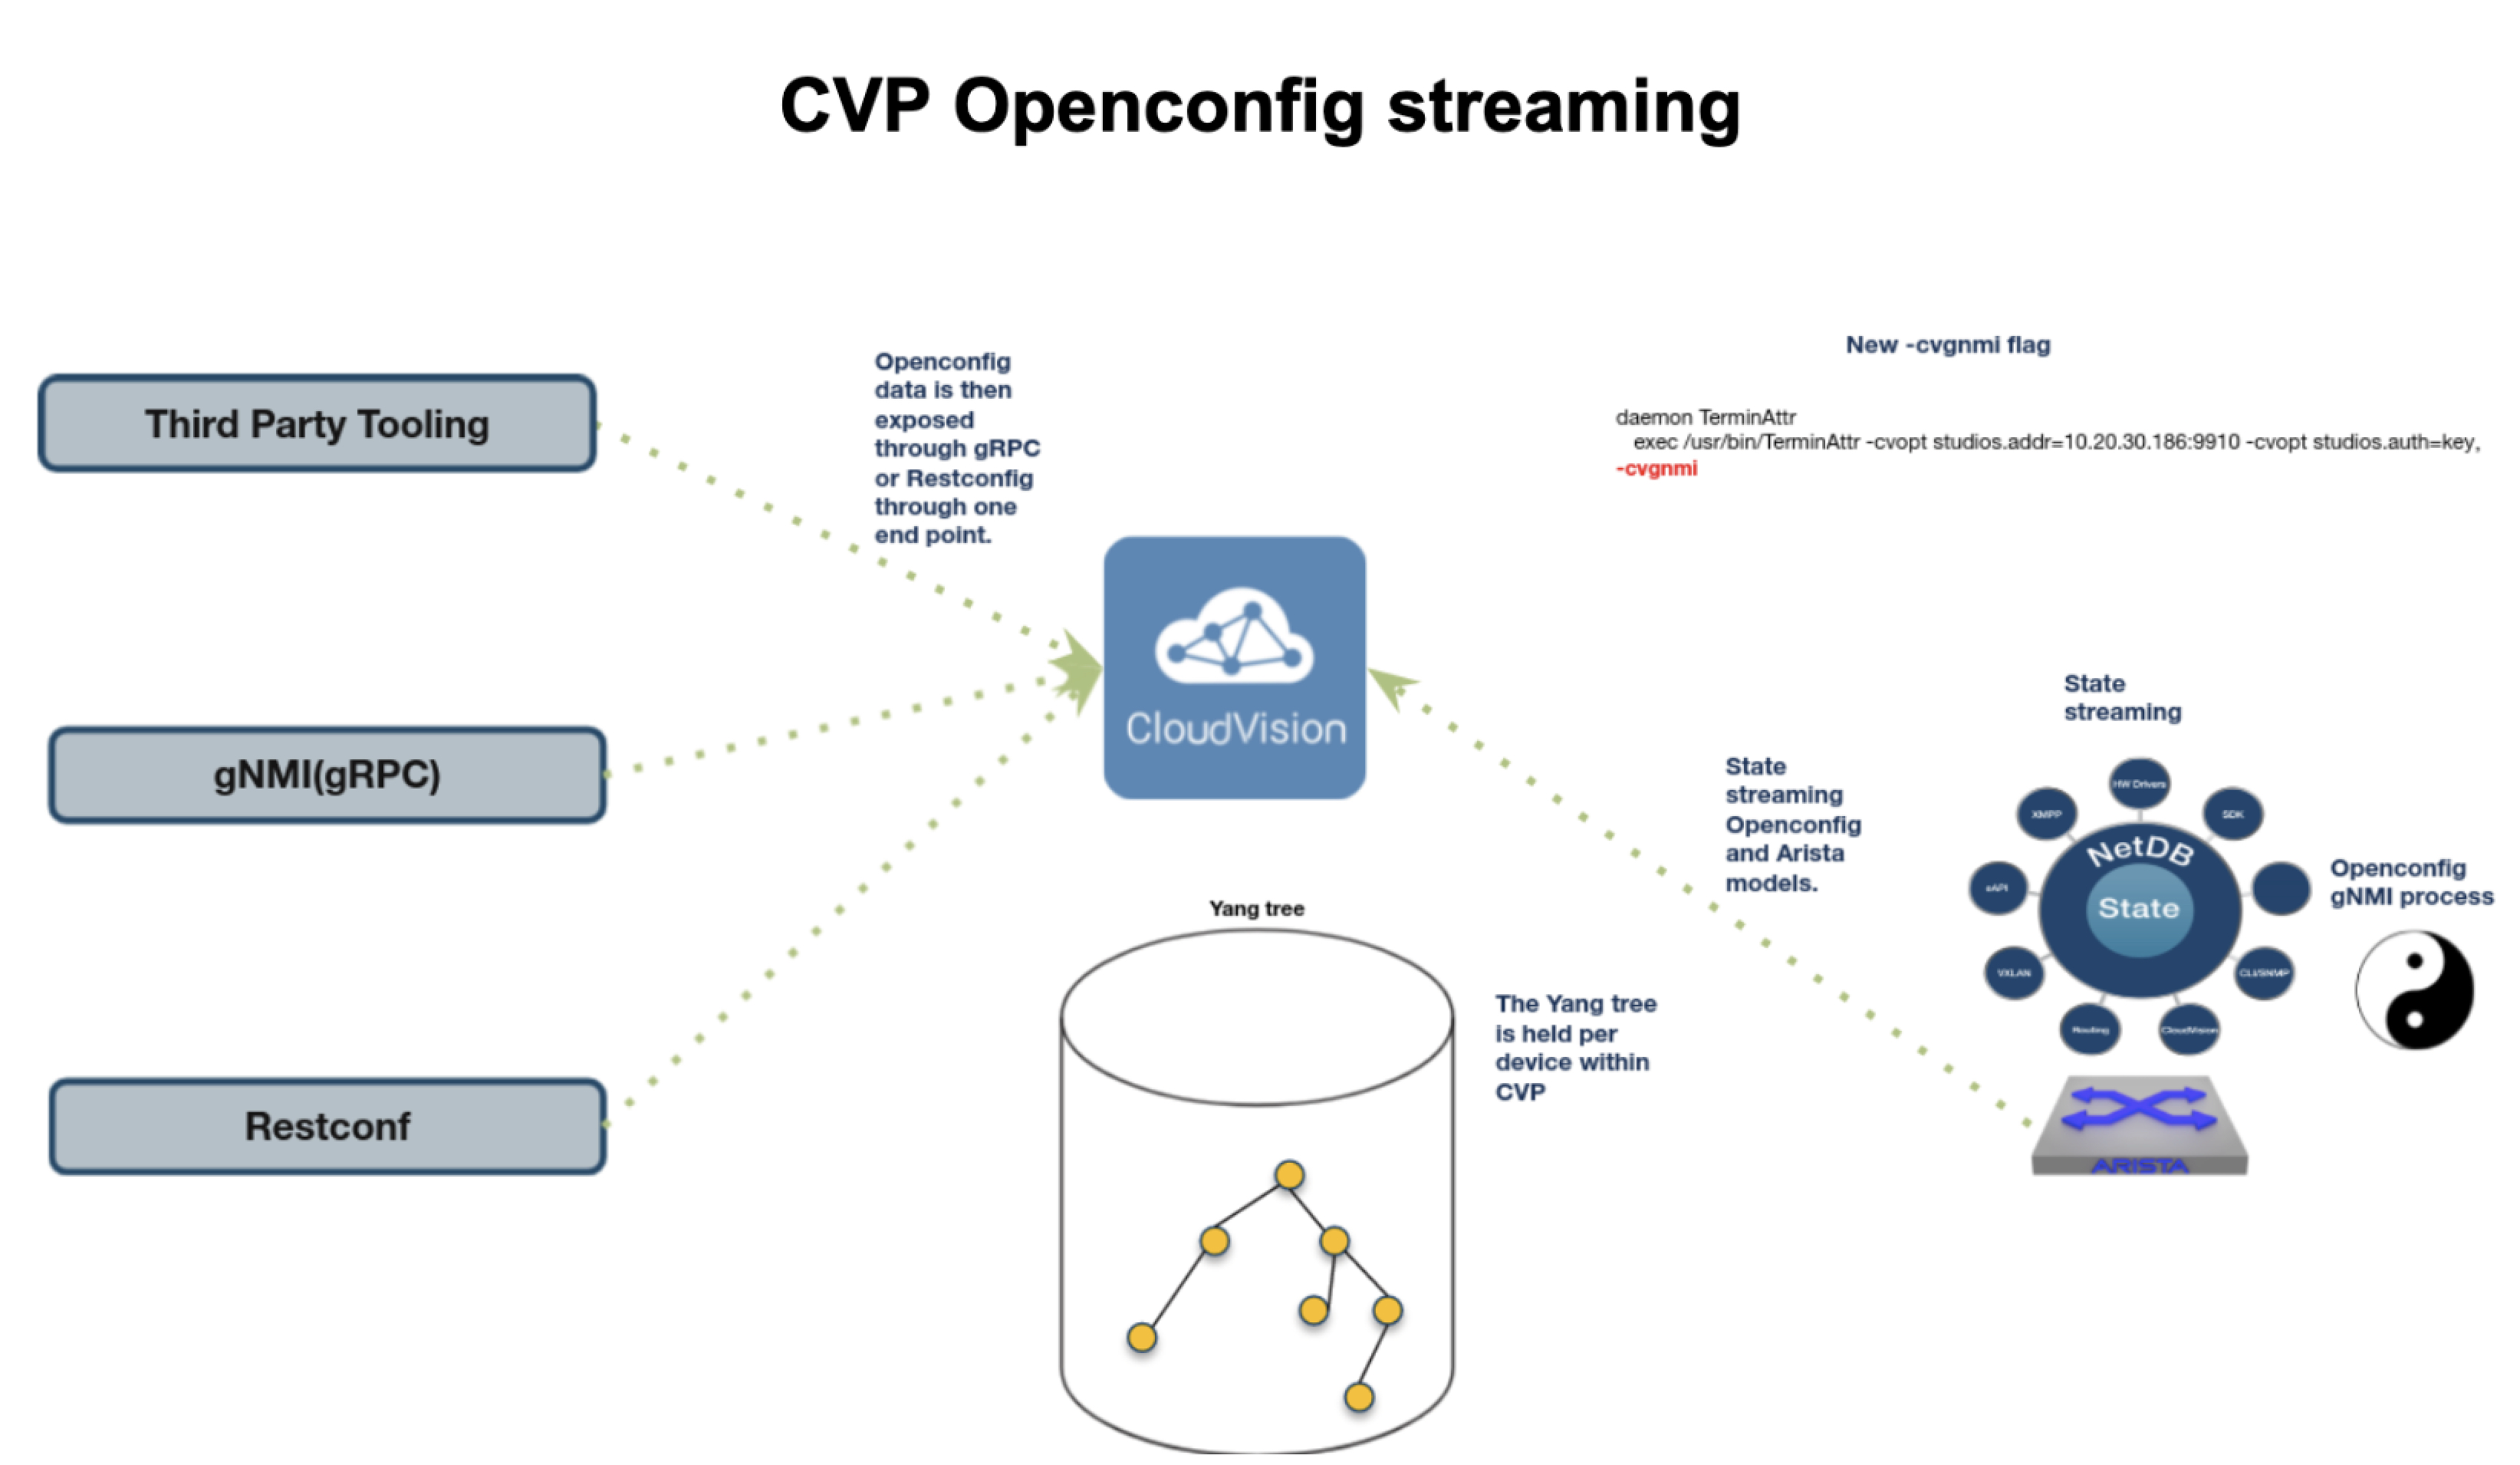
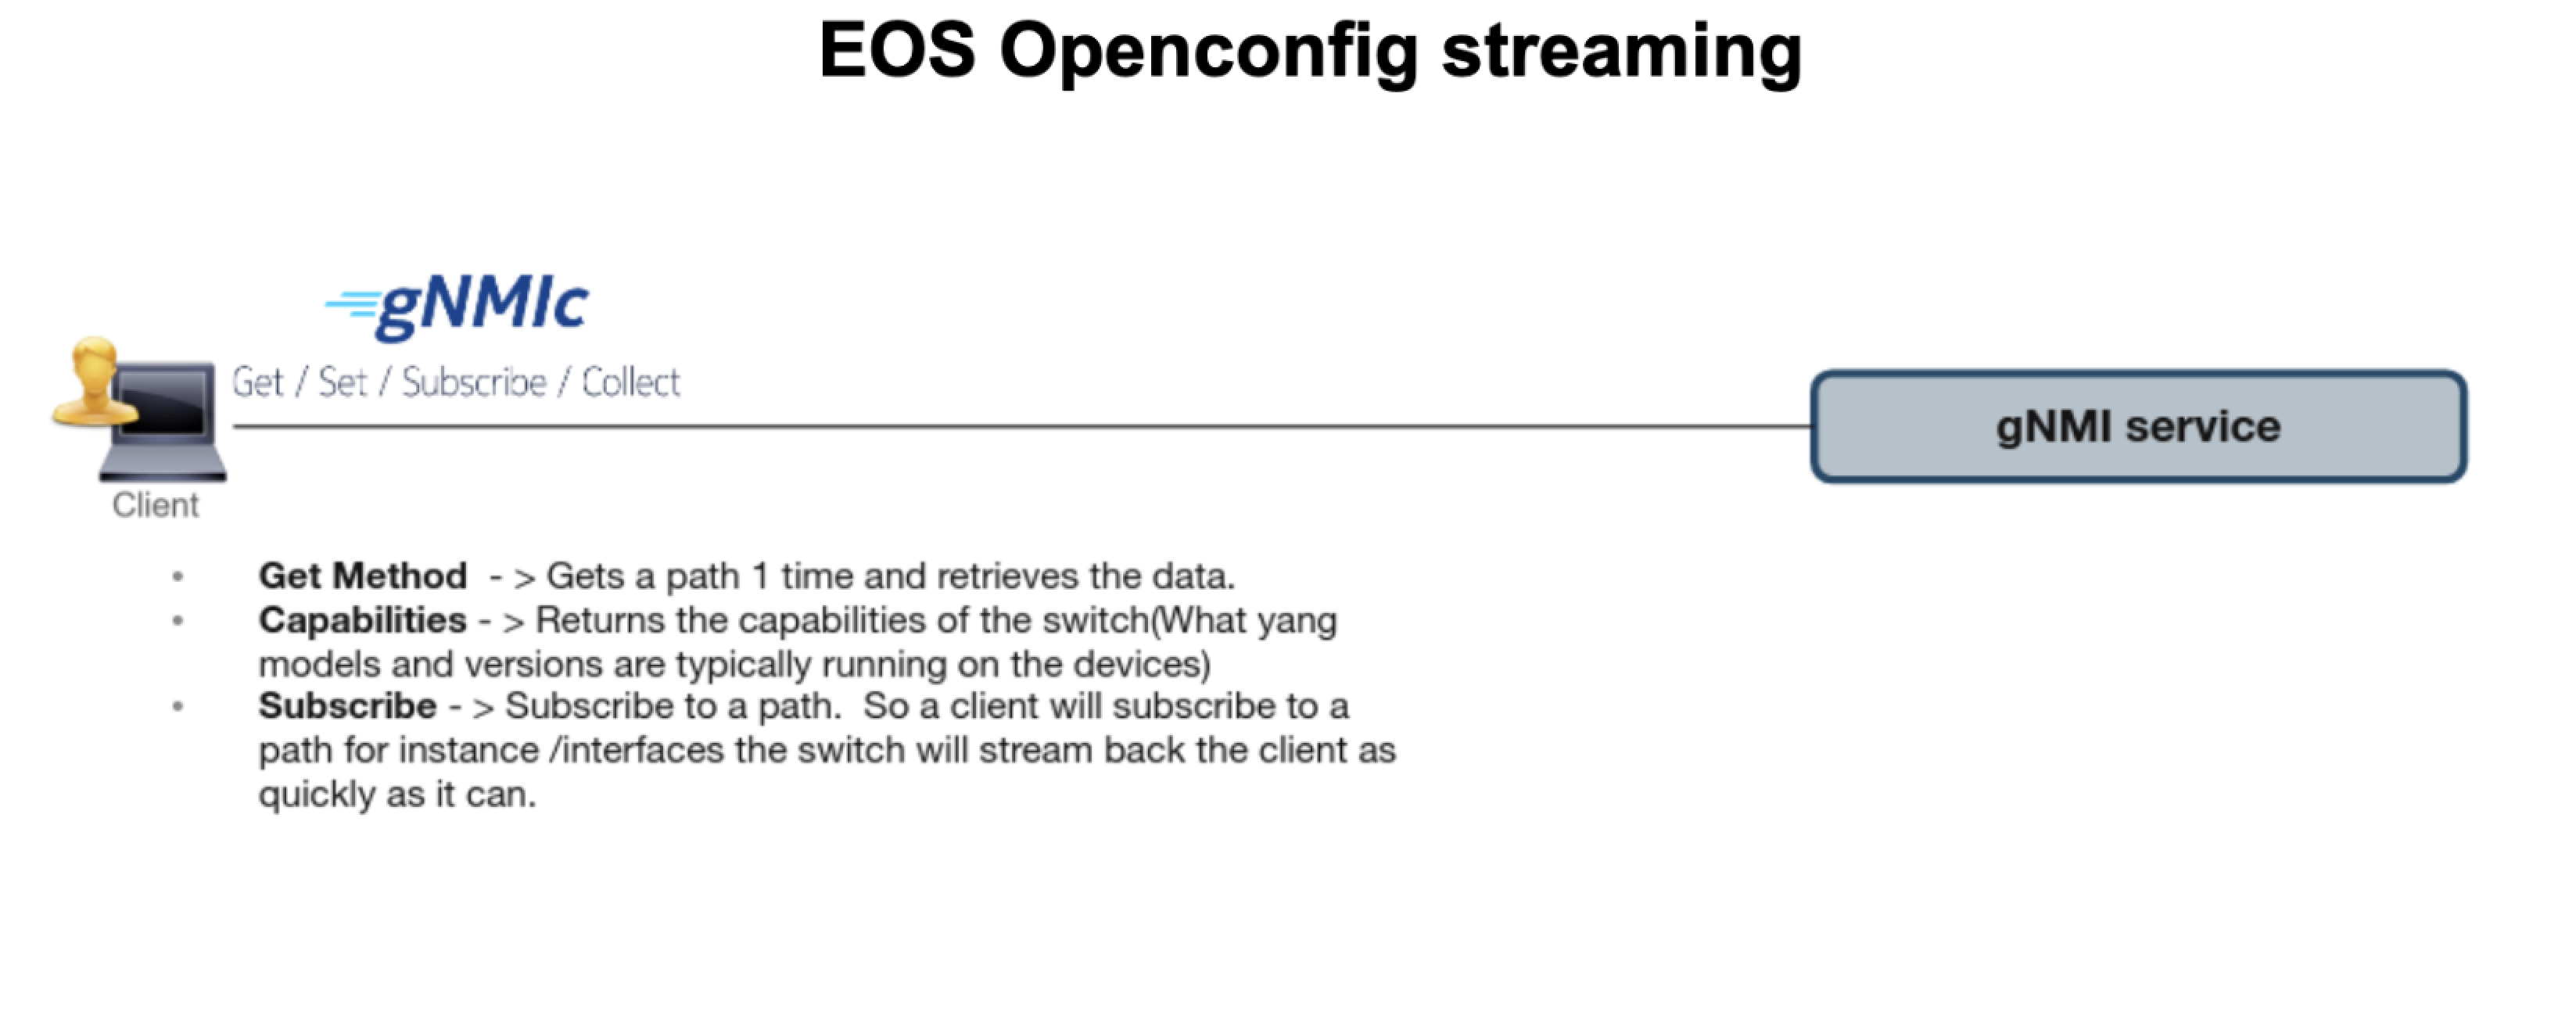
The following diagrams provide more information on the OpenConfig gNMI streaming interface.
Preparing The Lab
In order to complete this lab, the following changes need to be completed.
-
On each switch we want to gather streaming telemetry from, do the following.
Automate This!
You can save some time by adding these lines to the existing infrastructure configlet, since the Terminattr change below is within this configlet. Feel free to create a new gNMI configlet if you prefer.
-
Make the following configuration changes on each switch.
management api gnmi
transport grpc default
provider eos-native
!
management api models
provider aft
ipv4-unicast
ipv6-unicast
management api gnmi- This command turns on the gNMI service which is needed for gNMI.management api models- This command turns on airstream /streaming route tables through gNMI. -
Re-configure the TerminAttr daemon by issuing the configuration below.
daemon TerminAttr
exec /usr/bin/TerminAttr -disableaaa -cvaddr=192.168.0.5:9910 -taillogs -smashexcludes=ale,flexCounter,hardware,kni,pulse,strata -cvaddr=192.168.0.5:9910 -cvauth=token,/tmp/token -cvvrf=default -ingestexclude=/Sysdb/cell/1/agent,/Sysdb/cell/2/agent -cvgnmi
no shutdown
Note
Notice the -cvgnmi flag at the end. This is the flag that tells Terminattr to tunnel its openconfig traffic to CVP. For example, it will stream all of its OpenConfig traffic gNMI through Terminattr so it is accessible via CVP as well.
-
-
On our VSCode IDE, we will need to install gNMIC.
-
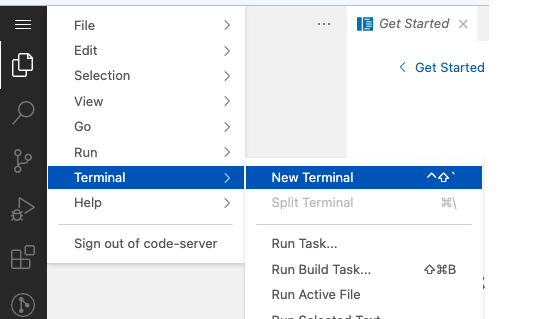
To install gNMIC we will first need to go to the Programmability IDE and open a new terminal. We do this once we are within the IDE by clicking the 3 line menu in the upper left > Terminal > New Terminal.
-
Install gNMIC by running the following command from the terminal.
-
To verify the installation issue the following command.
Expected Output
-
Lab Tasks
The tasks for this lab will be broken out into two parts, connecting to an EOS device and connecting to CVP for streaming telemetry.
Connecting to an EOS Device
-
Capabilities - To test what the device is capable of, ie., which YANG models are currently supported and which encapsulations are available we will need to show the capabilities. In this task we will check to see the capabilities of s1-leaf.
Issue the following command.
Password
Ensure you replace
passwordwith your unique password from the ATD dashboard.Expected Truncated Output
gNMI version: 0.7.0 supported models: - openconfig-platform-port, OpenConfig working group, 0.4.2 - openconfig-platform-transceiver, OpenConfig working group, 0.8.0 - arista-bfd-augments, Arista Networks <http://arista.com/>, 1.0.4 - ietf-yang-metadata, IETF NETMOD (NETCONF Data Modeling Language) Working Group, - openconfig-segment-routing-types, OpenConfig working group, 0.2.0 -
Get - A get request within gNMI is a good way to get a one way communication of a specific gNMI path. For example, if we want to get an Ethernet interfaces current status we would issue the following.
 gnmic -a 192.168.0.12:6030 -u arista -p password --insecure get --path \
"/interfaces/interface[name=Ethernet1]/state/oper-status"
Expected Output
[ { "source": "192.168.0.12:6030", "timestamp": 1653401690344274357, "time": "2022-05-24T14:14:50.344274357Z", "updates": [ { "Path": "interfaces/interface[name=Ethernet1]/state/oper-status", "values": { "interfaces/interface/state/oper-status": "UP" } } ] } ]- To get all possible paths within gNMI we would issue the following command.
-
Subscribe - The most powerful portion of gNMI and OpenConfig is the ability to subscribe to a specific path. The most common path to subscribe to would be all interface counters.
  gnmic -a 192.168.0.12:6030 -u arista -p password --insecure subscribe --path \
"/interfaces/interface/state/counters"
Expected Truncated Output
    {
    "source": "192.168.0.12:6030",
"subscription-name": "default-1653401885",
"timestamp": 1653401886216521708,
"time": "2022-05-24T14:18:06.216521708Z",
"updates": [
    {
        "Path": "interfaces/interface[name=Ethernet2]/state/counters/in-octets",
        "values": {
            "interfaces/interface/state/counters/in-octets": 424932
        }
    }
]
    }
    {
"source": "192.168.0.12:6030",
"subscription-name": "default-1653401885",
"timestamp": 1653401886216521708,
"time": "2022-05-24T14:18:06.216521708Z",
"updates": [
    {
        "Path": "interfaces/interface[name=Ethernet2]/state/counters/in-multicast-pkts",
        "values": {
            "interfaces/interface/state/counters/in-multicast-pkts": 3310
        }
    }
]
    }
Note
The stream will run endlessly until the user cancels it by pressing ctrl+c. You can subscribe to any path within EOS.
- To subscribe to the routing tables within gNMI we would issue the following command.
gnmic -a 192.168.0.12:6030 -u arista -p squfc11ze7gfnojz --insecure subscribe --path \
eos_native:/Smash/routing/status/route
Expected Truncated Output
{ "source": "192.168.0.12:6030", "subscription-name": "default-1653402161", "timestamp": 1653402062845675336, "time": "2022-05-24T14:21:02.845675336Z", "prefix": "network-instances/network-instance[name=default]/afts/ipv4-unicast/ipv4-entry[prefix=192.168.0.0/24]/state", "updates": [ { "Path": "next-hop-group", "values": { "next-hop-group": 4294967297 } }, { "Path": "origin-protocol", "values": { "origin-protocol": "openconfig-policy-types:DIRECTLY_CONNECTED" } }, { "Path": "prefix", "values": { "prefix": "192.168.0.0/24" } } ] }- Press Ctrl+c to stop the stream.
-
If you’d like to see the administrative status of an interface change in real time, you can use the GET command we used above, but replace get with subscribe. The command should look like this.
 gnmic -a 192.168.0.12:6030 -u arista -p password --insecure subscribe --path \
"/interfaces/interface[name=Ethernet1]/state/oper-status"
Once you’ve run this command, open an SSH session to
leaf1and shutdownEthernet1. The change is reflected instantly in gNMI.
Connecting to CVP
The same gNMI service that we use for EOS we are able to use with CVP. In the use case of CVP, we use the Path Target field to distinguish between different EOS devices. For example, in every outgoing request of gNMI stream we have to embed the serial or deviceID of the EOS device to stream data from it. This offers the tremendous advantage of talking only to CVP for all of the devices we want to stream device telemetry from versus going to each device individually.
-
Token - Since CVP does not use a username/password for the gNMI service, a service account and token are required.
-
Click the Settings gear in the bottom left hand corner of CVP to open settings. Then on the left click Service Accounts.
-
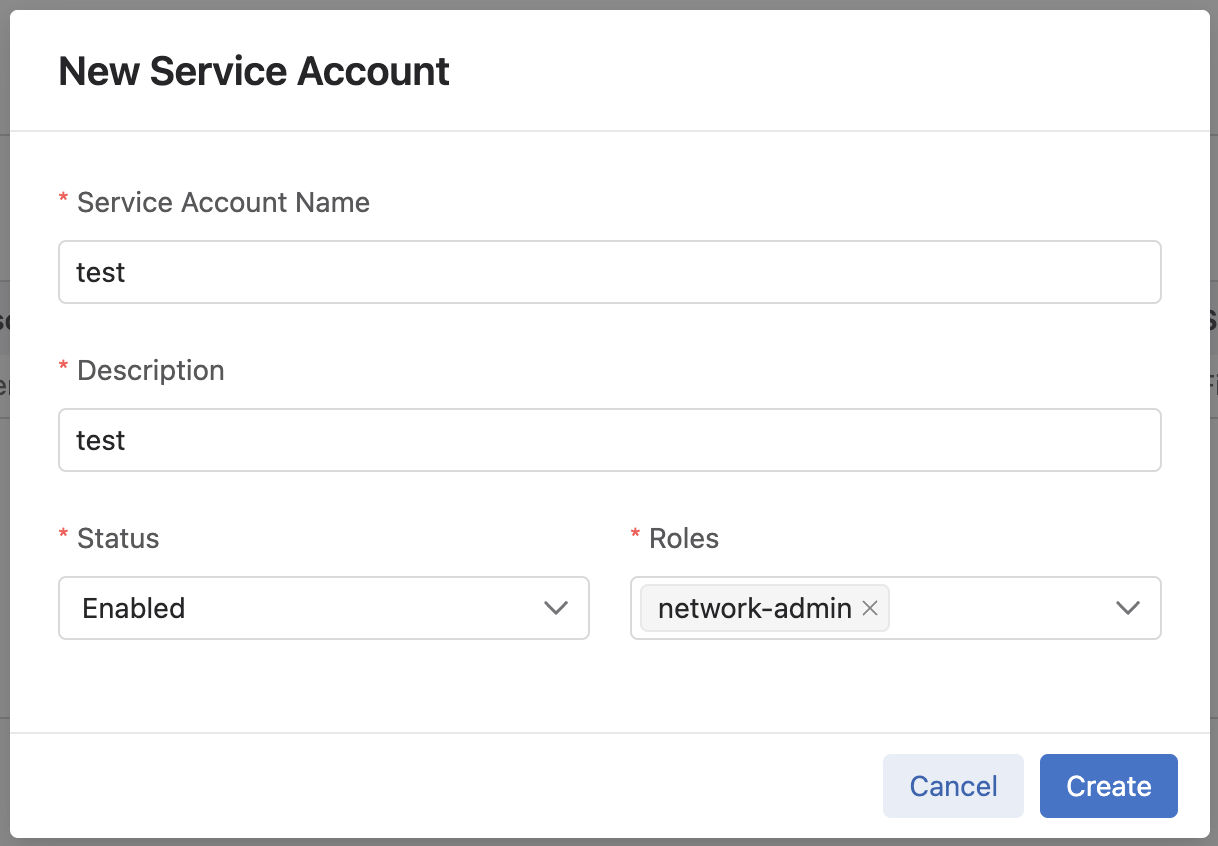
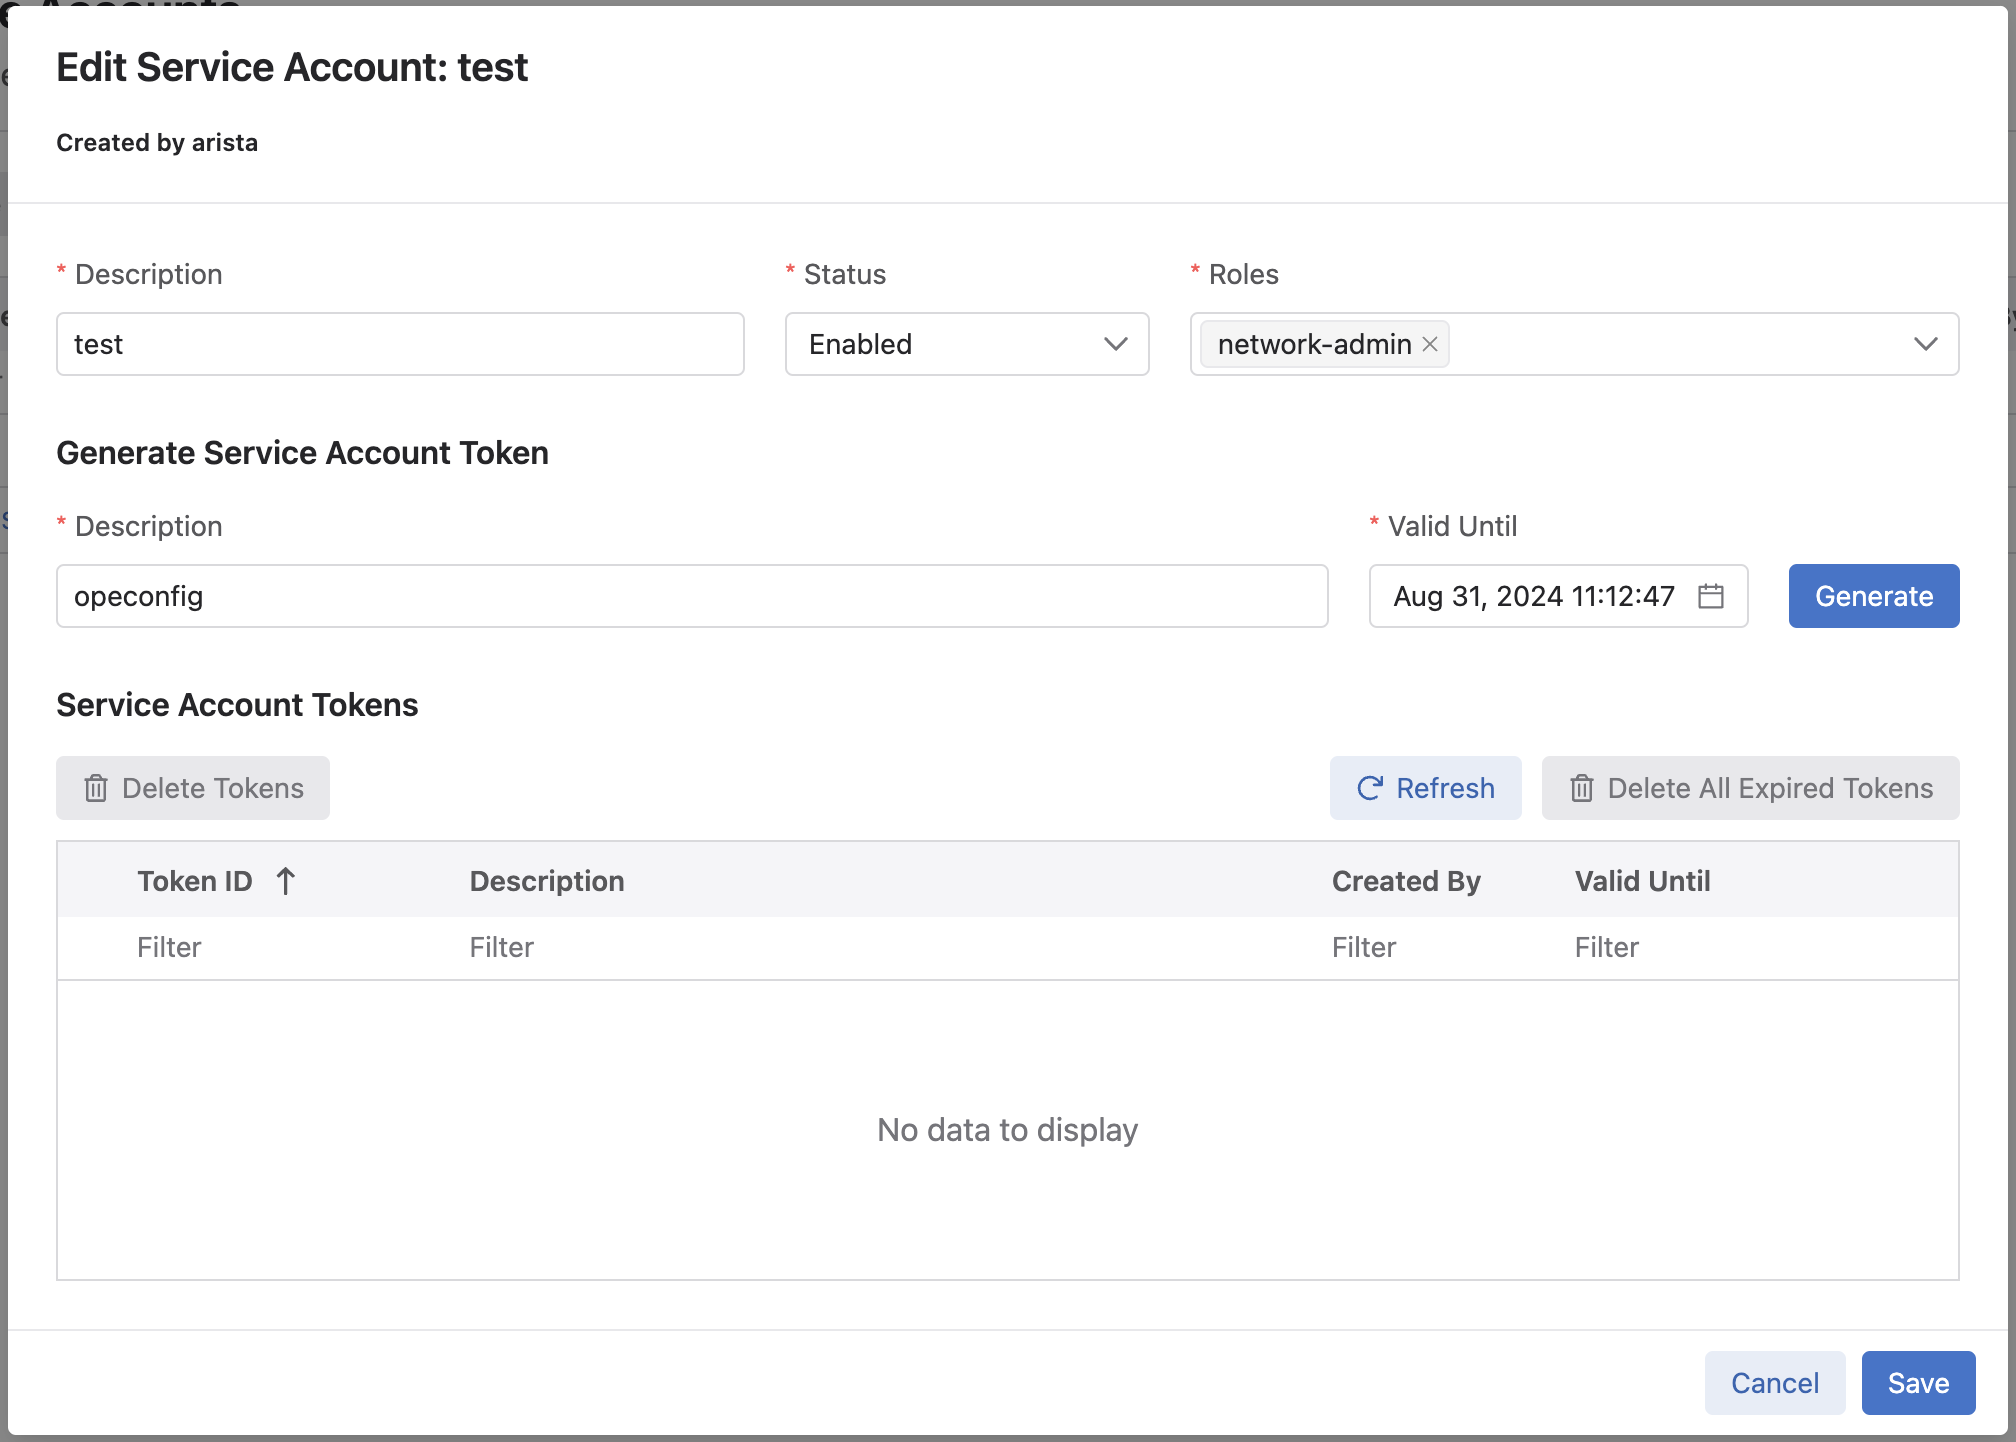
Click + New Service Account and configure the following values.
Service Account Name: testDescription: testStatus: EnabledRoles: network-admin
-
Click Create.
-
To create a token for test, back in the Service Accounts page, click the user name
test. -
Under the Generate Service Account Token section, give your token a
description, select aValid Untildate in the future. Click Generate. -
A new window will pop up with your token, ensure you copy it somewhere like a text editor or test file.
-
Click Save.
-
-
Subscribe to
s1-leaf1’s interface counters.-
First we need to create an environmental variable for the token. Let’s go back to Programmability IDE and run the following, pasting your own token value on the
export TOKENline.export TOKEN=<paste CVP token value here> gnmic -a 192.168.0.5:443 subscribe --path "openconfig:/interfaces/interface/state/counters" --token=$TOKEN --target=s1-leaf1 --skip-verifyIn this example, we are asking CVP to subscribe to the path of interface state counters using our Token for the target of
s1-leaf1. If this is tested against a device that is not standard cEOS it is typically going to be the devices serial number.Expected Truncated Output
    {
"source": "192.168.0.5:443",
"subscription-name": "default-1653404149",
"timestamp": 1653402066603530716,
"time": "2022-05-24T14:21:06.603530716Z",
"target": "s1-leaf1",
"updates": [
    {
        "Path": "interfaces/interface[name=Ethernet4]/state/counters/in-fcs-errors",
        "values": {
            "interfaces/interface/state/counters/in-fcs-errors": 0
        }
    },
    {
        "Path": "interfaces/interface[name=Ethernet4]/state/counters/in-unicast-pkts",
        "values": {
            "interfaces/interface/state/counters/in-unicast-pkts": 0
        }
    }
Press ctrl+c to stop the stream of data.
-
Success
Lab Complete!
