eAPI
This lab will walk you through using eAPI through Python. As mentioned in the previous lab and the presentation, eAPI works through JSON requests and responses. Fortunately, Python has a module that can handle that easily!
If you haven’t used Python before, don’t worry! We will break down the first script to explain how it works, and what it’s doing.
The scripts below leverage show commands, but you can easily modify them to issue configuration commands as well. You can use what you learned in the previous lab to do that.
Note
While Arista switches have a fully functional Python installation, please make sure to use the lab VM for the scripting part of this lab.
Script Overview
For the first script, we are going to issue show version to the switch, and then print the output.
#!/usr/bin/env python3

from jsonrpclib import Server
import ssl

ssl._create_default_https_context = ssl._create_unverified_context

switch = Server("https://arista:<password>@192.168.0.12/command-api")

response = switch.runCmds( 1, ["show version"] )

print(response)
Let’s break down the script into individual pieces:
#!/usr/bin/env python3: This is called a shebang (no, we didn’t make this up!). A shebang instructs the operating system what to use to run the script. In this case, python!
from jsonrpclib import Server: This imports the Python submodule Server from the module jsonrpclib. A Python module extends the capability of Python by adding additional functionality. There are Python modules for pretty much everything!
import ssl: This imports the Python ssl module.
ssl._create_default_https_context = ssl._create_unverified_context: This command is used to ignore self-signed certificates within this lab.
switch = Server ( “https://arista:<password>@192.168.0.12/command-api”): This instantiates a variable - switch - and uses the Server submodule imported previously to create a connection to the switch. Note that it uses standard username/password formatting to make the connection.
Warning
Make sure you replace the password field with the password from your ATD environment dashboard or the API call will fail.
response = switch.runCmds( 1, [“show version”] ): This instantiates a variable called response - that uses the previously created switch.runCmds variable to run commands. This is where it starts getting interesting.
print(response): This prints the response variable to screen.
Once we create the switch connection, runCmds is the method provided by the switch’s JSON-RPC interface which allows us to run commands against it. As a part of runCmds, we also expect an API version (1) and the command itself, in this case show version.
If you rewind and go back to the Command API Explorer Lab, you would see that in the Request Viewer pane:
Make note of the method, cmds, and version keys!
Note
The other values, such as format, timestamps, and id are defaults and do not need to be specified in your request.
Lab Tasks
Now lets write the code. Connect to the Programmability IDE. If prompted for a password, enter in your lab password from the ATD dashboard.
-
To start writing our first script, click on
File -> New Fileto open a new file. Then start typing in the code from above.Tip
Alternatively, you can copy and paste it right into VS Code by using
Ctrl+von Windows orCmd+von MAC.Once done, save the file to your project/labfiles directory.
-
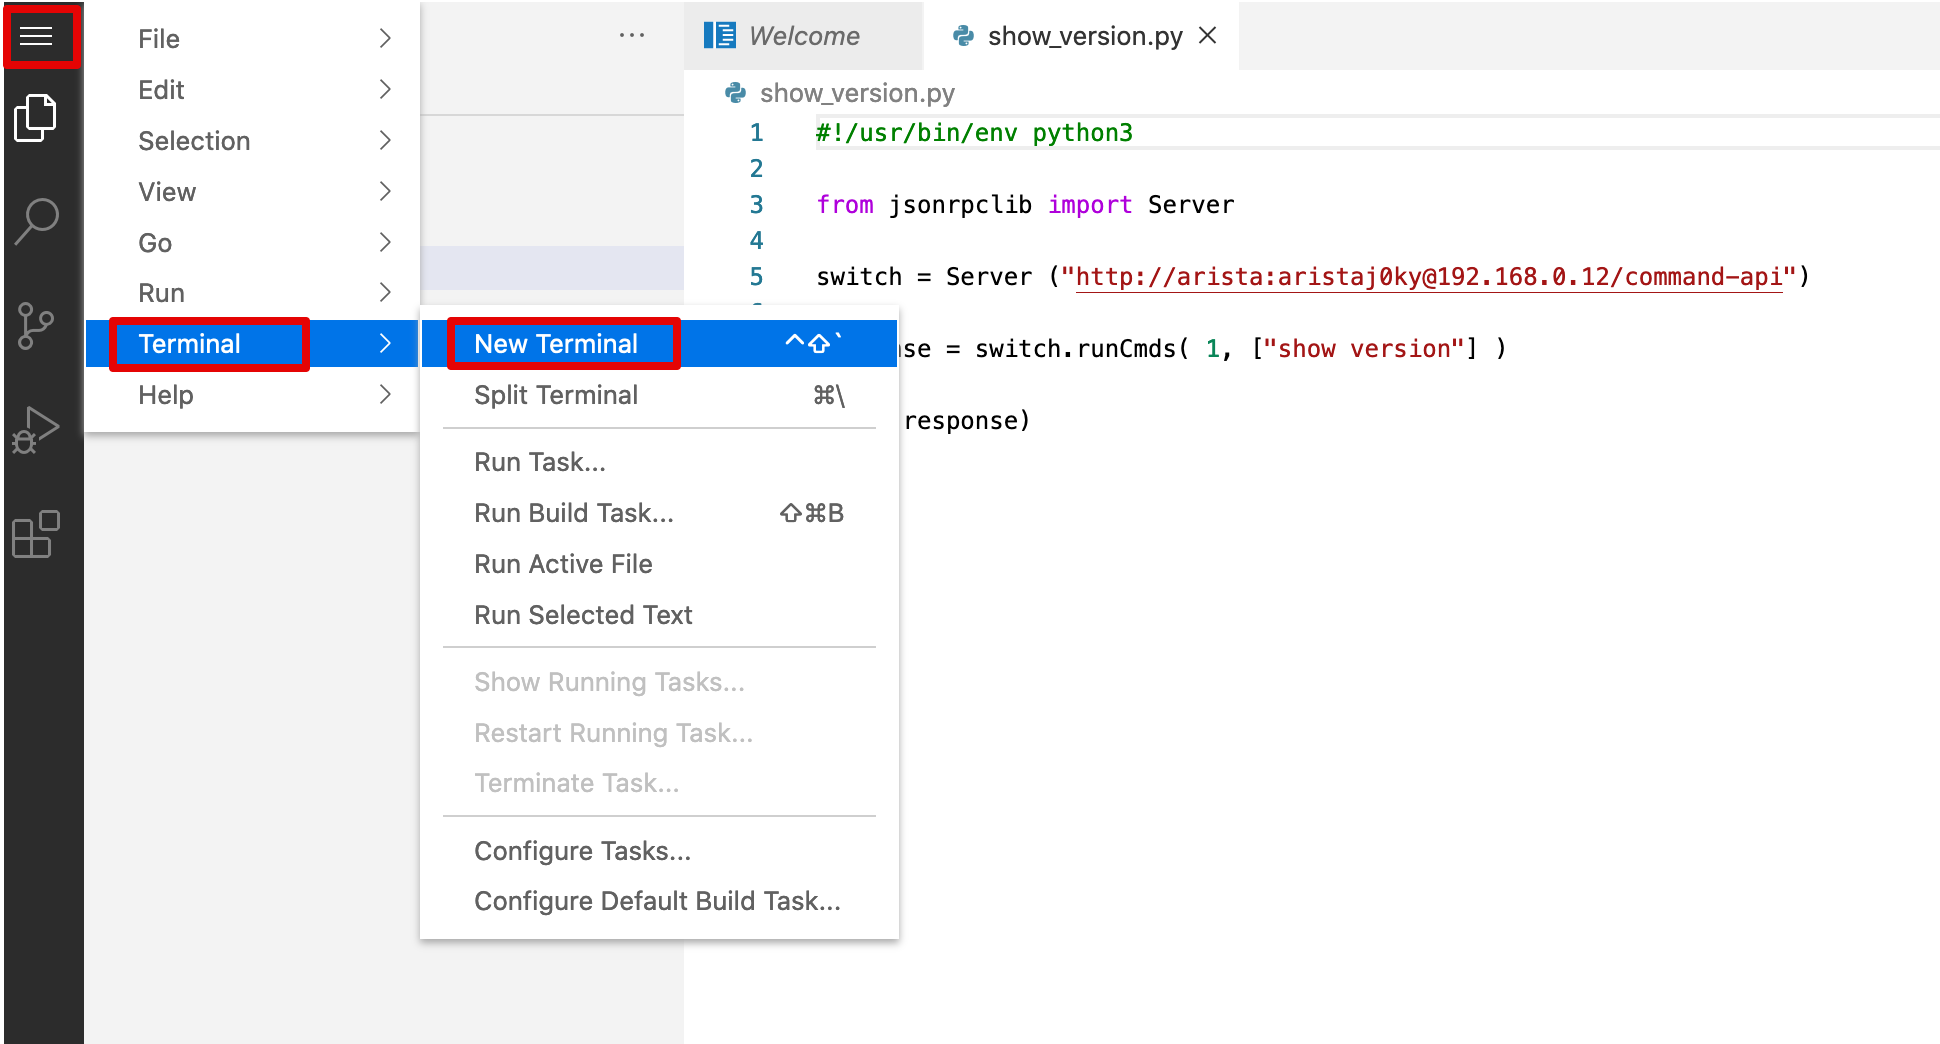
Now, let’s run our script. Within the IDE, you can use any of the following to open a Terminal window:
A terminal window will open. Run your script by entering:
Note
Make sure you replace
show_version.pywith the filename of the script you saved above if the name differed.Executable
For the more Linux savvy folks, you might wonder why we’re calling Python directly instead of relying on the aforementioned shebang
#!/usr/bin/env python3. If you want to make the file executable go for it. -
Now we can verify our script by viewing the JSON output.
Bonus Tasks
-
Let's modify the script to give it some additional output in the print statement.
#!/usr/bin/env python3 from jsonrpclib import Server import ssl ssl._create_default_https_context = ssl._create_unverified_context switch = Server("https://arista:<your lab cred pass here>@192.168.0.12/command-api") response = switch.runCmds( 1, ["show version"] ) print("The switch model name is " + response[0]["modelName"] + " and it is running " + response[0]["version"]) -
Print the response of show version using PrettyPrint.
There are plenty of other possibilities here. Think about your day to day operations and things that you have to do frequently that take a lot of time, but are tedious and error prone. Any Python script that can be run against one switch can be run against many more. Adding a VLAN to every switch in your Data Center might just involve providing a list of switch hostnames or IP addresses, a VLAN ID, and a name and your script will do it all for you!
Success
Lab Complete!


