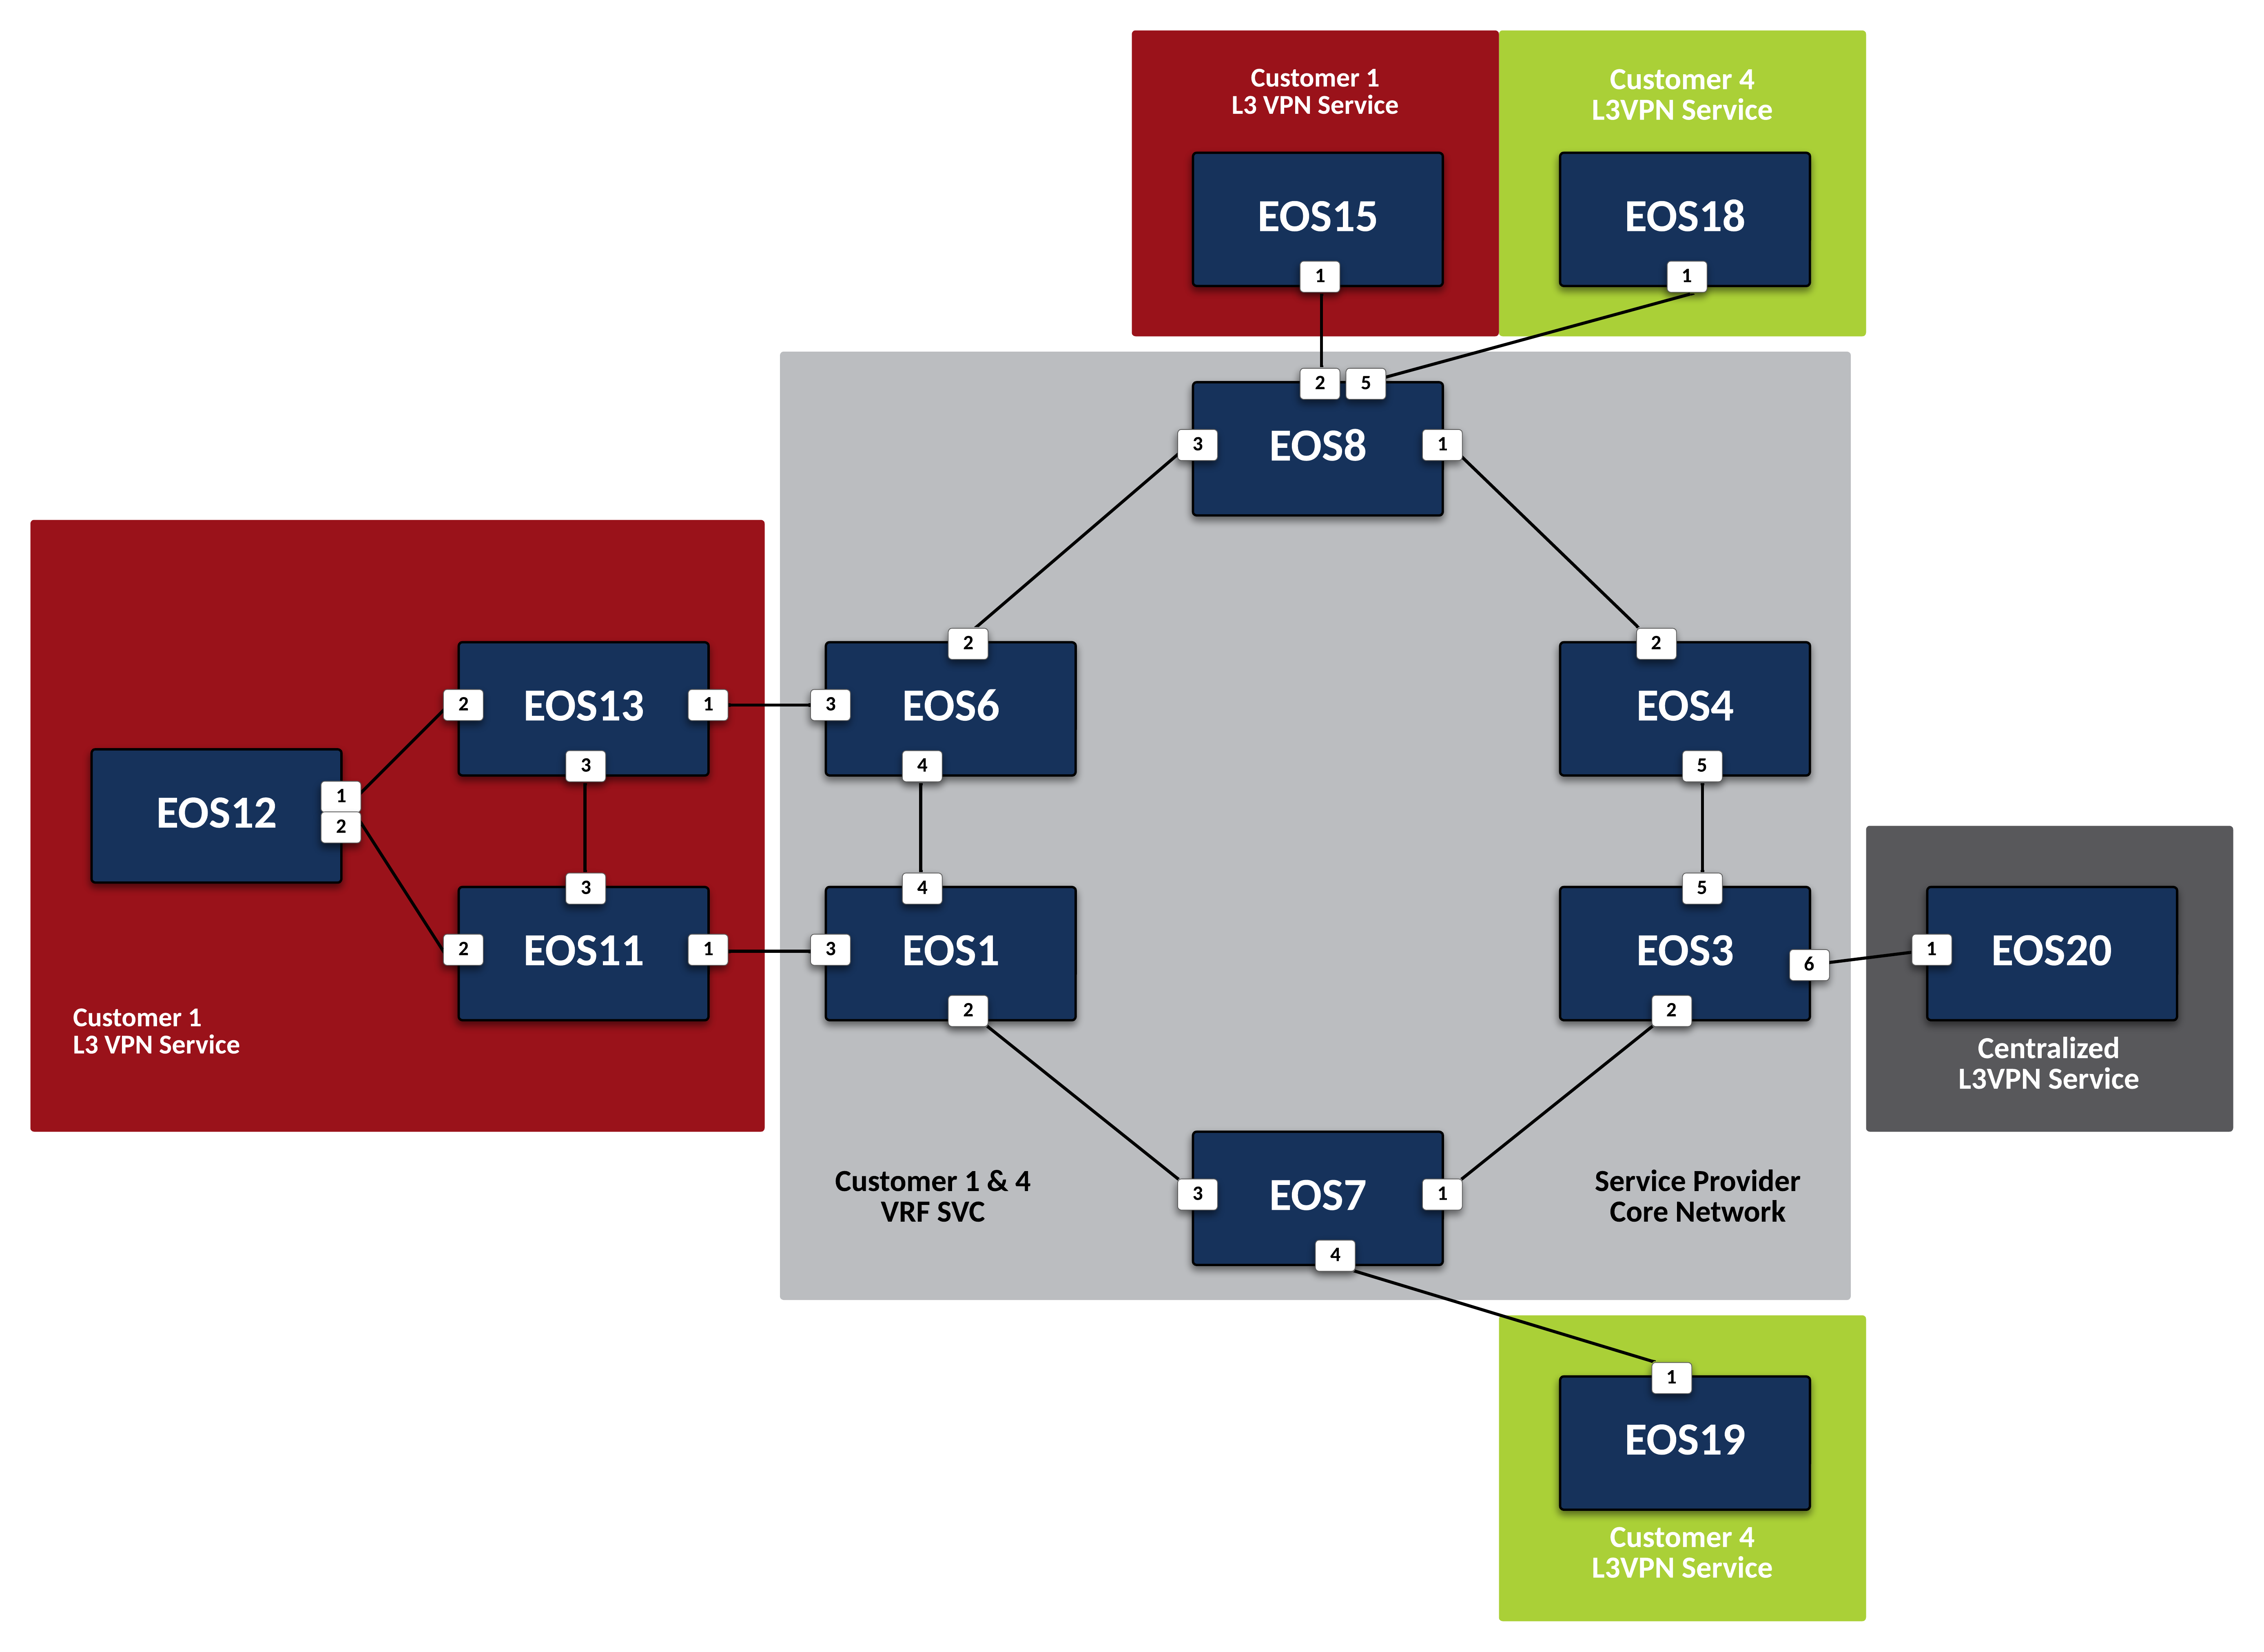
Offer Centralized Services to L3VPN Customers
Preparing The Lab
- Log into the LabAccess jumpserver:
- Type
labs, or select Option 97 to get to theAdditional Labsmenu. - Type or select the option for
ring-topology-evpn-supplemental-labsin order to get to the EVPN labs. - Type
centsvcin this menu to configure the topology with the necessary prerequisites.
- Type
Lab Tasks
-
The Centralized Service is attached to Service Provider node
EOS3. These will be our PE node. Since this Centralized Service will be accessed via a Layer 3 VPN Service, create an isolated VRF for its traffic and use EVPN to advertise the customer networks to other interested PEs.-
Create a VRF Instance called SVC on
EOS3.Note
While this service will be accessed by Customers attached to other PEs, we will leverage EVPN to allow for inter-VRF communication and only require the SVC VRF where the node attaches to the Service Provider network.
-
Place the interface attached to the CE node for the Centralized Service into VRF SVC on
EOS3to ensure its traffic remains isolated. -
Now leverage BGP EVPN to advertise reachability of any routes learned in VRF SVC from the Centralized Service by setting an RD and an RT within BGP on
EOS3. It should have a unique RD following the format of Loopback0 IP:5 and the RT on all routers in the VPN should be 5:5.Note
Unlike our previous L3VPN setups, for the Centralized Service model, we will only need to export the routes learned in the SVC VRF with this RT. In a later step, we will see how inter-VRF route-leaking can be controlled using a separate RT for import.
-
Finally, define the BGP peer facing the Centralized Service node for route exchange into the VRF on
EOS3. The CE node (EOS20) will use BGP ASN 500.
-
-
Now that the PE node is configured, configure CE node
EOS20for Layer 3 attachment to the Service Provider network.-
Configure the BGP peerings to the PE devices on
EOS20ensuring that the router’s Loopback0 address is advertised to the attached PE. -
Verify the BGP peering is active but that no routes have been learned from the PE.
-
-
With the Centralized Service attached to the Service Provider network, configure restricted access to the service IP of 20.20.20.20 without using ACLs, allowing only
EOS12andEOS19to access the Service.-
First, define a new RT of 500:500 that will be used for importing routes from
EOS12andEOS19into the SVC VRF onEOS3.Note
The PE Nodes attached to Customer-1 and Customer-2 will handle the export of the routes for
EOS12andEOS19with the proper RT, so onEOS3we only need to worry about importing EVPN Type-5 routes with 500:500 into the Centralized Services VRF. -
Now, export the route for 12.12.12.12/32 from the Customer-1 VRF on PE nodes
EOS1andEOS6using the RT of 500:500. To ensure only the route forEOS12is exported on the PEs, use a Route-Map and Prefix-List to control application of the RT.Info
Applying the route-map to the EVPN export statement will allow 500:500 to be tagged onto the EVPN Type-5 route in addition to the Customer-1 default RT of 1:1.
-
Similarly, on
EOS7, configure a Route-Map and Prefix-List to export the route forEOS19, 19.19.19.19/32, with the RT of 500:500. -
Now, allow PEs
EOS1andEOS6to import the route for the Centralized Service with the RT of 5:5 into the VRF for Customer-1.Info
This will allow the PEs to advertise the route for the Centralized Service, 20.20.20.20/32, to the attached CE nodes.
-
Finally, repeat the above step on
EOS7to import the Centralized Service route into the VRF for Customer 4.
-
Testing
-
With the necessary inter-VRF route leaking configuration in place, validate the
EOS12andEOS19can reach the Centralized Service while other CE nodes for the Customers cannot.-
View the routing tables of
EOS12andEOS19to ensure the route for the Centralized Service, 20.20.20.20/32 is present.Note
EOS19will receive the route directly via the BGP peering to the adjacent PE node.EOS12will have the route received via OSPF where it was redistributed by the Customer-1 CE nodesEOS11andEOS13. -
Verify connectivity from
EOS12andEOS19to the Centralized Service at 20.20.20.20 from each router’s Loopback0 IP.EOS12
EOS19
-
Display the routing table of
EOS20to ensure only the routes for the allowed Customer nodes are present.Note
Only routes for the Loopback0 interfaces of
EOS12andEOS19should be learned from the Service Provider network. -
Confirm that other Customer-1 and Customer-2 nodes cannot access the Centralized Service.
Note
EOS11andEOS13will have the route for the Centralized Service, but since the Centralized Service does not have a return route, no connections can be completed. Other customer nodes will not have the route at all.
-
-
On the Service Provider network, verify that the Centralized Service routes and approved Customer node routes are being exchanged with the proper EVPN and MPLS information.
-
On
EOS3, verify the incoming routes for forwarding path forEOS12andEOS19from the SVC VRF.Info
The EVPN routes have two RTs attached to them; one from the standard L3VPN export and one from the Route-Map to ensure it is imported properly into the SVC VRF. Since the Route-Map has the additive keyword, it will allow both to be present and not overwrite.
-
On
EOS6, verify the incoming routes for forwarding path forEOS20from the CUSTOMER-1 VRF.
-
Success
Lab Complete!
